How to continue using your existing email address
If you've switched to Plusnet recently and you want to continue using your old email address, find out what you need to do here.
Select your provider
If you've switched from another provider, chances are you may want to continue using your old email address.
If your previous provider allows this (you'll need to ask them if you're not sure) and you use an email program to check your messages (such as Outlook, Windows Mail, Mac Mail or Thunderbird) then you'll need to make a small change to your settings. Otherwise you'll be able to receive new messages but you won't be able to send them.
To fix this, change your outgoing server to relay.plus.net and if you're using authentication, switch that off.
If you're not sure how to do this, here are guides for the most popular email programs:
1. Windows Mail
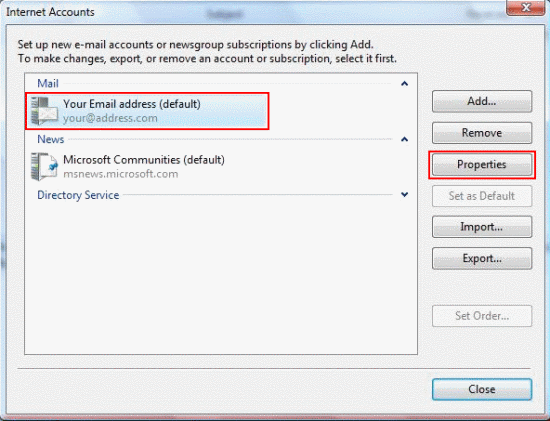
Go to Tools on the top bar and select Accounts

- The Internet Accounts window will appear
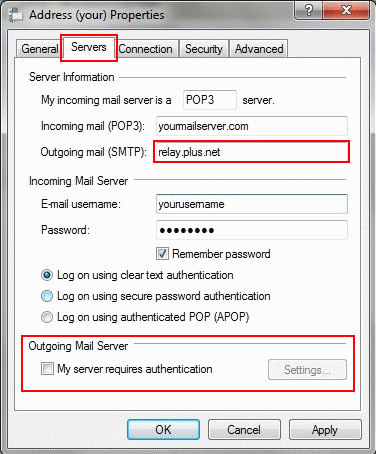
- On the properties window, click the Servers tab

- Leave the Incoming mail (POP3), E-mail username and Password as they are, these settings allow you to receive messages and will not need changing
- Change the Outbound (SMTP) server to relay.plus.net
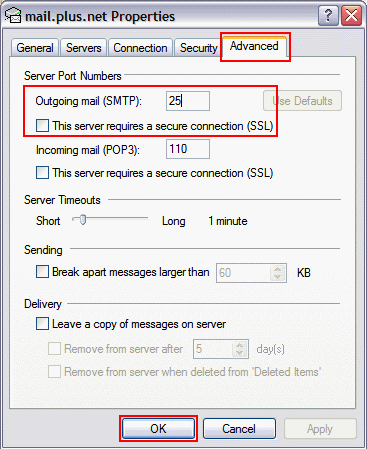
- At the bottom, make sure My server requires authentication is unticked
Click Apply and move to the next step Now click the Advanced tab and make sure the settings match the ones you see below:
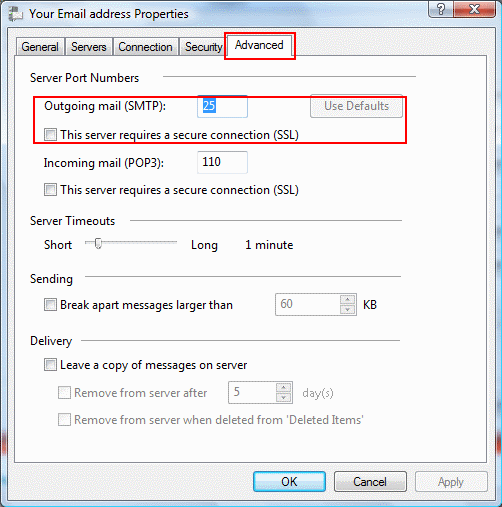
- Click OK to finish.

Select the name of the account you want to update, then click Properties


You'll now be able to send email with the address supplied by your previous provider.
2. Windows Live Mail
Right click on the Email account you want to check and select Properties

- On the properties window, click the Servers Tab
- Leave the Incoming mail (POP3), E-mail username and Password as they are, these settings allow you to receive messages and will not need changing
- Change the Outbound (SMTP) server to relay.plus.net
- At the bottom, make sure My server requires authentication is unticked
Click Apply and move to the next step - Now click the Advanced tab and make sure the settings match the ones you see below:

Click OK to finish


You'll now be able to send email with the address supplied by your previous provider.
3. Microsoft Outlook 2007
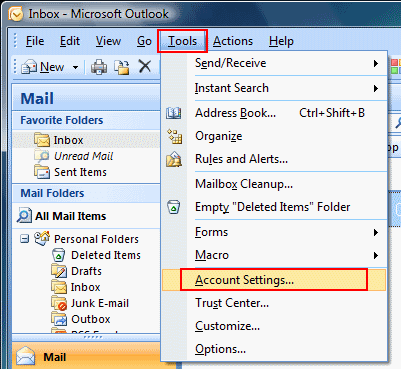
Go to Tools on the top bar and select Account Settings
- The Account Settings window should appear, from here select the account you want to edit and click Change...
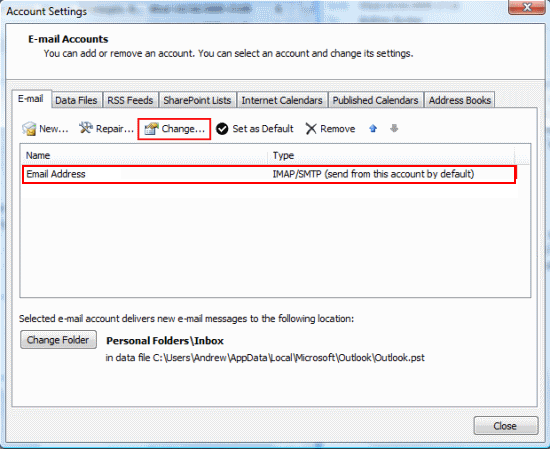
- Change Outgoing mail server (SMTP) to relay.plus.net and click More Settings...
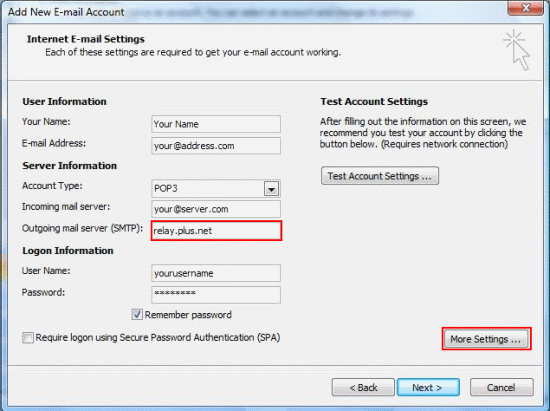
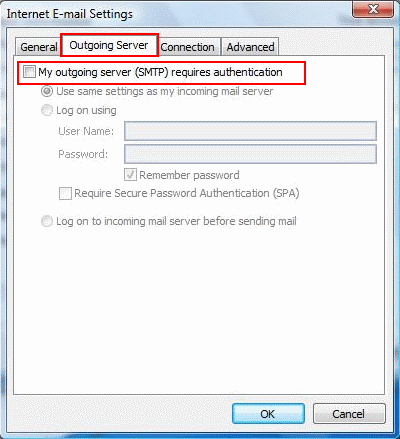
- On the Internet E-mail Settings window, click the Outgoing Server tab and make sure that My Outgoing Server (SMTP) requires authentication is unticked
- Now click the Advanced tab and make sure the settings match the ones you see below
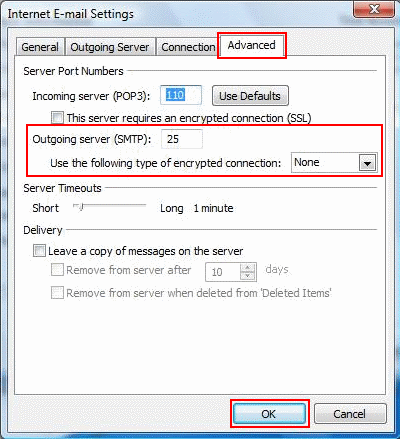
- Click OK and you'll be back at the Change Email Account window shown in step 3, click Next and then close the Congratulations screen
- You'll be back at the Account Settings window shown seen in step 2, click Close to finish


You'll now be able to send email with the address supplied by your previous provider.
4. Mozilla Thunderbird 3
- Open Thunderbird, go to Tools on the top bar and click Account Settings

- Click Outgoing Server (SMTP) on the left hand menu, select the default SMTP account and click Edit on the right hand side
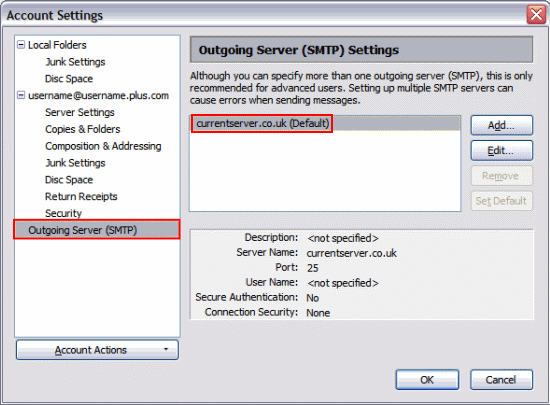
- Now you'll see the SMTP server window
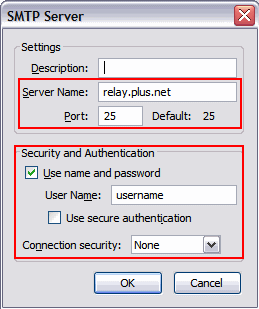
- The Server Name should be relay.plus.net and the Port should be 25
- If Use name and password is ticked, make sure that you enter your account username (the one you log into this website with) in the User Name box
- Make sure Use secure authentication is not ticked and Connection security is set to None
Click OK and you'll be back at the Account Settings window shown seen in step 2, click OK to finish.


You'll now be able to send email with the address supplied by your previous provider. When sending you'll be asked to enter a password, this needs to be your account password (the one you log into this website with). If you continue to have trouble sending mail, untick Use name and password and try again.
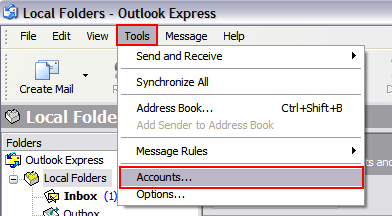
5. Outlook Express
Go to Tools on the top bar and select Accounts. The Internet Accounts window will appear
- Click on the Mail tab to see a list of mail accounts currently set up on this machine. Double-click on the Account name you want to update to open the Properties window for that account

- On the properties window, click the Servers Tab
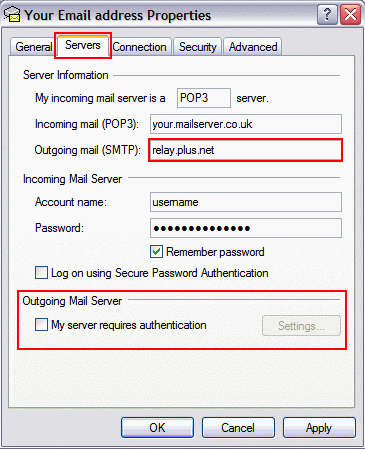
- Leave the Incoming mail (POP3), Account name and Password as they are, these settings allow you to receive messages and will not need changing
- Change the Outbound (SMTP) server to relay.plus.net
- Make sure My server requires authentication at the bottom is unticked
Click Apply and move to the next step
Click the Advanced tab and make sure the Outgoing Mail settings match the ones you see below:
Click OK and you'll be back at the Internet Accounts window shown seen in step 2, click Close to finish


You'll now be able to send email with the address supplied by your previous provider.
If you've switched from another provider, chances are you may want to continue using your old email address.
If your previous provider allows this (you'll need to ask them if you're not sure) and you use an email program to check your messages (such as Outlook, Windows Mail, Mac Mail or Thunderbird) then you'll need to make a small change to your settings. Otherwise you'll be able to receive new messages but you won't be able to send them.
To fix this, change your outgoing server to relay.free-online.net and if you're using authentication, switch that off.
If you're not sure how to do this, here are guides for the most popular email programs:
1. Windows Mail
Go to Tools on the top bar and select Accounts
- The Internet Accounts window will appear
Select the name of the account you want to update, then click Properties

- On the properties window, click the Servers tab
- Leave the Incoming mail (POP3), E-mail username and Password as they are, these settings allow you to receive messages and will not need changing
- Change the Outbound (SMTP) server to relay.free-online.net
- At the bottom, make sure My server requires authentication is unticked
Click Apply and move to the next step
- Now click the Advanced tab and make sure the settings match the ones you see below:
Click OK to finish.
You'll now be able to send email with the address supplied by your previous provider.
2. Windows Live Mail
Right click on the Email account you want to check and select Properties
- On the properties window, click the Servers Tab
- Leave the Incoming mail (POP3), E-mail username and Password as they are, these settings allow you to receive messages and will not need changing
- Change the Outbound (SMTP) server to relay.free-online.net
- At the bottom, make sure My server requires authentication is unticked
- Now click the Advanced tab and make sure the settings match the ones you see below:
Click OK to finish
Click Apply and move to the next step
You'll now be able to send email with the address supplied by your previous provider.
3. Microsoft Outlook 2007
Go to Tools on the top bar and select Account Settings
- The Account Settings window should appear, from here select the account you want to edit and click Change...
- Change Outgoing mail server (SMTP) to relay.free-online.net and click More Settings...
- On the Internet E-mail Settings window, click the Outgoing Server tab and make sure that My Outgoing Server (SMTP) requires authentication is unticked
- Now click the Advanced tab and make sure the settings match the ones you see below
- Click OK and you'll be back at the Change Email Account window shown in step 3, click Next and then close the Congratulations screen
- You'll be back at the Account Settings window shown seen in step 2, click Close to finish
You'll now be able to send email with the address supplied by your previous provider.
4. Mozilla Thunderbird 3
Open Thunderbird, go to Tools on the top bar and click Account Settings
Click Outgoing Server (SMTP) on the left hand menu, select the default SMTP account and click Edit on the right hand side
Now you'll see the SMTP server window
- The Server Name should be relay.free-online.net and the Port should be 25
- If Use name and password is ticked, make sure that you enter your account username (the one you log into this website with) in the User Name box
- Make sure Use secure authentication is not ticked and Connection security is set to None
Click OK and you'll be back at the Account Settings window shown seen in step 2, click OK to finish.
You'll now be able to send email with the address supplied by your previous provider. When sending you'll be asked to enter a password, this needs to be your account password (the one you log into this website with). If you continue to have trouble sending mail, untick Use name and password and try again.
5. Outlook Express
Go to Tools on the top bar and select Accounts. The Internet Accounts window will appear
Click on the Mail tab to see a list of mail accounts currently set up on this machine. Double-click on the Account name you want to update to open the Properties window for that account
On the properties window, click the Servers Tab
- Leave the Incoming mail (POP3), Account name and Password as they are, these settings allow you to receive messages and will not need changing
- Change the Outbound (SMTP) server to relay.free-online.net
- Make sure My server requires authentication at the bottom is unticked
Click Apply and move to the next step
Click the Advanced tab and make sure the Outgoing Mail settings match the ones you see below:
Click OK and you'll be back at the Internet Accounts window shown seen in step 2, click Close to finish
You'll now be able to send email with the address supplied by your previous provider.
If you've switched from another provider, chances are you may want to continue using your old email address.
If your previous provider allows this (you'll need to ask them if you're not sure) and you use an email program to check your messages (such as Outlook, Windows Mail, Mac Mail or Thunderbird) then you'll need to make a small change to your settings. Otherwise you'll be able to receive new messages but you won't be able to send them.
To fix this, change your outgoing server to relay.force9.net and if you're using authentication, switch that off.
If you're not sure how to do this, here are guides for the most popular email programs:
1. Windows Mail
Go to Tools on the top bar and select Accounts
The Internet Accounts window will appear
Select the name of the account you want to update, then click Properties
On the properties window, click the Servers tab
- Leave the Incoming mail (POP3), E-mail username and Password as they are, these settings allow you to receive messages and will not need changing
- Change the Outbound (SMTP) server to relay.force9.net
- At the bottom, make sure My server requires authentication is unticked
Click Apply and move to the next step
Now click the Advanced tab and make sure the settings match the ones you see below:
Click OK to finish.
You'll now be able to send email with the address supplied by your previous provider.
2. Windows Live Mail
Right click on the Email account you want to check and select Properties
On the properties window, click the Servers Tab
- Leave the Incoming mail (POP3), E-mail username and Password as they are, these settings allow you to receive messages and will not need changing
- Change the Outbound (SMTP) server to relay.force9.net
- At the bottom, make sure My server requires authentication is unticked
Click Apply and move to the next step
Now click the Advanced tab and make sure the settings match the ones you see below:
Click OK to finish
You'll now be able to send email with the address supplied by your previous provider.
3. Microsoft Outlook 2007
Go to Tools on the top bar and select Account Settings
The Account Settings window should appear, from here select the account you want to edit and click Change...
Change Outgoing mail server (SMTP) to relay.force9.net and click More Settings...
- On the Internet E-mail Settings window, click the Outgoing Server tab and make sure that My Outgoing Server (SMTP) requires authentication is unticked
- Now click the Advanced tab and make sure the settings match the ones you see below
- Click OK and you'll be back at the Change Email Account window shown in step 3, click Next and then close the Congratulations screen
- You'll be back at the Account Settings window shown seen in step 2, click Close to finish
You'll now be able to send email with the address supplied by your previous provider.
4. Mozilla Thunderbird 3
Open Thunderbird, go to Tools on the top bar and click Account Settings
- Click Outgoing Server (SMTP) on the left hand menu, select the default SMTP account and click Edit on the right hand side
- Now you'll see the SMTP server window
- The Server Name should be relay.force9.net and the Port should be 25
- If Use name and password is ticked, make sure that you enter your account username (the one you log into this website with) in the User Name box
- Make sure Use secure authentication is not ticked and Connection security is set to None
Click OK and you'll be back at the Account Settings window shown seen in step 2, click OK to finish.
You'll now be able to send email with the address supplied by your previous provider. When sending you'll be asked to enter a password, this needs to be your account password (the one you log into this website with). If you continue to have trouble sending mail, untick Use name and password and try again.
5. Outlook Express
Go to Tools on the top bar and select Accounts. The Internet Accounts window will appear
- Click on the Mail tab to see a list of mail accounts currently set up on this machine. Double-click on the Account name you want to update to open the Properties window for that account
- On the properties window, click the Servers Tab
- Leave the Incoming mail (POP3), Account name and Password as they are, these settings allow you to receive messages and will not need changing
- Change the Outbound (SMTP) server to relay.force9.net
- Make sure My server requires authentication at the bottom is unticked
Click Apply and move to the next step
Click the Advanced tab and make sure the Outgoing Mail settings match the ones you see below:
Click OK and you'll be back at the Internet Accounts window shown seen in step 2, click Close to finish
You'll now be able to send email with the address supplied by your previous provider.

More ways to get help
Plusnet community
Our customers always have tips to share.
Talk to our community
Sign Language service
Contact us using British Sign Language
My Account
Manage your bills, packages and details.
Sign into Broadband
